|
White Ink Settings |
| |
The following three; Transparent Color, Tolerance, Choke Width settings are all for white mask data.
 When you select CMYK only in main menu, those three settings are invalid. When you select CMYK only in main menu, those three settings are invalid.
|
|
Transparent Color |
| |
A transparent color is a color with no ink printed. GT-3 always regards RGB=255 white as transparent color. You can add one more here.
Remember we have a check box called [ print with black ink ] in CMYK + White of main menu. When you check it off, GT-3 will make colors with White, Cyan, Magenta, Yellow ink and black garment color because black garment is blacker than black ink. In this case RGB=0 black is transparent too.
Select one color that you do not want to print either from the list (examples of T-shirt colors) or click [ Custom Color ] to select one RGB value. Then both 255 white and your selected color will be transparent. Be sure to make [ Print with Black Ink ] on manual when you use this menu. Click here for some examples.
 Our concept of printing on the GT-3, click here. Our concept of printing on the GT-3, click here.
|
|
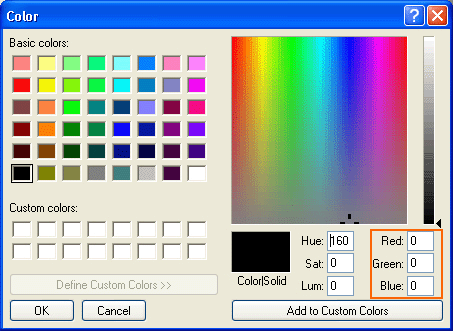
Custom Color |
| |
Input RGB values for transparent color. Only one custom color is available.
The following shows that RGB=0 black is selected as custom color. You can select by clicking a color or inputting RGB values in the right (inside orange square). |
| |
|
| |
Custom color is not added in the list. You must select every time you print.
|
|
Tolerance |
| |
The gradation range (distance of each RGB value) from "unprinted" transparent color to the normal print color.
See the following sample and just image what's going on with the printer driver. |
| |

Test a sample, a gradation from RGB=0 black to RGB=128 gray, 600 dpi,
transparent color is RGB=0, printed by Photoshop CS
 
Tolerance=0, CMYK data and white data on light gray by Brother GT File Viewer
 
Tolerance=30 (default)
 
Tolerance=50 (maximum)
|
| |
You can see the difference of the white mask layer. Details are not precisely reproduced, but you can see where the white mask starts according to tolerance. Even tolerance=0 the printer driver has some margins, not to produce sudden change of colors.
You can see some black thin tails in the CMYK data. This is because of resampling by the application caused by the resolution of image, which sometimes causes accidental troubles. (In this case this issue will disappear when the resolution of image and the printer (600/1200dpi) is the same, but the file size and the time to resample will be huge!) Be sure to check the print data with Brother GT File Viewer.
|
|
Choke Width |
| |
This cuts off only the outline of the white mask area to avoid white ink showing out of the color print. 1 is 1 ink dot. Default is 2, normally 1-3. The bigger the number, thinner white will disappear. If you are a new operator, then try "3" to save money. A T-shirt may shrink on the Platen when you print White Ink. This may be because you stretch the T-shirt in curing Pretreatment, or you put the T-shirt stretched on the Platen before printing.
When the resolution of the original image is low (e.g. left image, 72 dpi), one bitmap square is larger and resampling is less accurate. Keep the resolution at least 200 dpi, however 300 dpi is better. Click here for more information about resolution.
If the white lines are seen everywhere in one direction, like white shadow, alignment of both carriages may not be adjusted properly. Execute White/Color Alignment first with Brother GT-3 Maintenance of Brother GT-3 Tools in your PC.
If the white lines are seen everywhere in right/left of the image, firing may not be adjusted. Execute firing adjustment first with Brother GT-3 Maintenance.
If print data is like the left image below, wide white lines and dots are seen around the image, it is too much for adjusting choke width. Go back to the original image and check RGB values. This is caused by either "anti-alias" bitmap or resampling issues by application software.
To avoid this, use drawing application software e.g. CorelDRAW or Illustrator, then the print data will be fine like the right image. |
| |
  
Print data of low resolution, highly-compressed jpg file and vector data (Illustrator)
by Brother GT File Viewer
|
|
White / Color Pause |
| |
This menu is to move the GT-381/GT-361 like GT-782:
 (1) Loading Platen (1) Loading Platen
(2) Printing White
(3) Loading Platen again and
(4) Printing Color
to avoid the CMYK ink sinking inside the White ink. Use this menu ON when you print a very small image.
|
|
Color Processing |
| |
This menu is to improve the colors of the original image, "Vivid Processing" of GT-541.
|
|
Color Settings: Saturation |
| |
This function is to arrange the image of saturation by the Printer Driver. We recommend you to use the graphic application software (e.g. Photoshop) to arrange the colors, but if you are not familiar with the functions, then you can try this menu. When you print an image with CMYK color mode, select 10-30. Test print when you select higher than 30, because sometimes it changes colors too much. Better not to use more than 20 when you print human faces: he/she will soon print "drunk" or "sunburn".
|
|
Color Settings: Contrast |
| |
Same as Saturation above. When you print an image with CMYK color mode, select 10-20 together with saturation. Test print when you select higher than 30, because sometimes it changes colors too much.
If you like GT-541 output, select only contrast as 10, 20, 30 and 40.
|
|
Transparent Layer Settings |
| |
This function is the original in GT-3, which is to print the image on the PNG Transparent Layer. GT-3 cannot print at one time, but can do by dividing the original PNG image into the Transparent Information PNG file (Gray Scale) and the RGB Information PNG file (RGB). Make the ARTR file first with the Transparent Information PNG file, and combine it when you print the RGB Information PNG file. Actually you do not need Photoshop anymore; if your application software can keep the resolution (Microsoft Paint is available only for 72 dpi!).
The process is quite complicated, but we have a special tool SeparatePNG.exe in [ Brother GT-3 Tools ]. Actually this tool was available after the Printer Driver was fixed. So please refer to the ReadMe.pdf in [ Brother GT-3 Tools ] rather than the Instruction Manual.
|
  
|
| |
Transparent Information in gray scale RGB Information RGB Information
|


Combined AR3 file
|
| |
Those who have trouble with the gradation on a transparent layer, this tool is for you!
|
|
Uni-Directional Printing |
| |
On GT-541, this function is only available from the operation panel, after receiving print data. In GT-3, the same as GT-782, you can do both with printer side and printer driver side. Printer driver can make one print uni-directional, just like double printing. Then the print data is always operated as uni-directional print when the setting of the printer is "AUTO". The value of print direction set by the operation panel has priority. Click here for more information.
|
|
Rollover Help |
| |
With mouse's rollover, there shows help of each setting. Check it if necessary. But if you need
further information, come back to GT-3 Cookbook!
|