|
Machine Mode |
| |
One GT-3 Printer Driver is common for GT-3 Series: GT-381/GT-361/GT-341. GT-381 can print GT-361 data (with CMYK, W1 and W2) and GT-341 data (with CMYK) but you cannot print GT-381 print data with GT-361/GT-341 because the data structure is different.
The [ Default ] Button is available for the selected Machine Mode.
|
|
Job Comment |
| |
You can enter a comment here, size, volume, etc. which is indicated on LCD of GT-3, instead of the file name. 30 letters are available. If this box is left blank, "Job Name" LCD only indicates the file name.
|
|
Advanced button |
| |
This button is to open the Advanced Menu.
|
|
Platen Size |
| |
Platen 14x16 is standard. We have option platen 10x12 (Youth), platen 7x8 (Baby). With GT-3 FileOutput Printer Driver, you can see the layout and other information as well. Use youth or baby platens when you print tanks, bags, aprons.
Confirm the icon on the Panel  if the real Platen fits the print data. When GT-3 receives print data with the different platen size, a sound "ping-pong-pong-pong" rings. if the real Platen fits the print data. When GT-3 receives print data with the different platen size, a sound "ping-pong-pong-pong" rings.
 Take care of the platen height when you change platens, at any time. Print with Uni-directional print if necessary. Take care of the platen height when you change platens, at any time. Print with Uni-directional print if necessary.
When you make print data by 10" x 12" platen size and use 14" x 16" platen in print, you can print but notice that the print data is located in the center middle.
|
|
Resolution |
| |
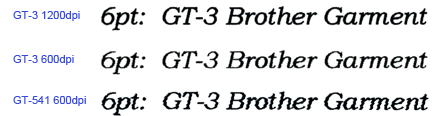
Select either 1200dpi x 1200dpi or 600dpi x 600dpi, depending on your request, either print quality or print speed.
The following image is the actual print, on photo paper and scanned by 600dpi scanner. You can see the improvement of 600dpi print compared with GT-541/GT-782, but of course 1200dpi is more precise than that.
|
| |
|
|
Ink: Color + White |
| |
Print color ink on white mask layer. You can also select if you use black ink or not, CMY gray or not with check boxes below. Select by the relations of the image and the T-shirt color, and ink cost as well.
|
|
Ink: White Only |
| |
You can print an image as white monochrome or written with white chalk. Use when you want to print only with white ink.
|
|
White Settings: Highlight |
| |
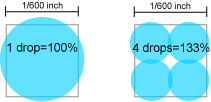
You can manage the "whiteness of the print" by controlling the white ink volume, the value of Highlight. Check the Print Time and the Whiteness = White Ink Volume of the RGB=254 white color. The percentage there tells you the volume of White Ink by simple mathematics:
The standard is GT-381, 600dpi x 600dpi print duty. This means the maximum white ink volume of 600dpi x 600dpi one-pass print for the RGB=254 white color is:
 100% print x 4 print heads = 400% (Highlight=3) 100% print x 4 print heads = 400% (Highlight=3)
So, if you print with 1200dpi x 1200dpi, this means, 4 small drops are printed in the same area of 1 drop with 600dpi x 600dpi.
|
| |
  14:20 2012/05/14 14:20 2012/05/14
|
| |
So, maximum white ink volume of 1200dpi x 1200dpi one-pass print for the RGB=254 white color is:
133.33...% print x 4 print heads = 533% (Highlight=5)
These numbers, 400% and 533% are the key to understand the required time in printing. If you select more than 400% (Highlight=4 or higher) in 600dpi, or more than 533 (Highlight=6 or higher) in 1200dpi, then the print time will be doubled.
Now you see that it is not a good idea to select Highlight=5 in 600dpi x 600dpi, Color print is still 600dpi, but because the white ink volume and the print time are the same with Highlight=5 in 1200dpi x 1200dpi print, I mean the quality of Color print is different.
Sorry to confuse you, but please think twice, why you select 600dpi x 600dpi, or 1200dpi x 1200dpi with the indication there.
The settings are simple, but it means a lot!
If you have a GT-361, then everything for White print is double GT-381.
Our suggestions is to select Highlight=5 in 1200dpi x 1200dpi print. If you are in a hurry and the T-shirt color is lighter, or just CMYK print, then it is a good choice to select 600dpi x 600dpi.
The menu Highlight controls the White Ink Volume, but the print time also depends on other settings like [ Color Multiple Pass Printing ] and [ White / Color Pause ] in the Advanced Menu. Check the number in [ Print Time ], remember the standard "x1" is always
400% White Ink Volume in 600dpi x 600 dpi.
|
|
White Settings: Mask |
| |
You can control the "covering=whiteness" of white ink under the darker colors. Normally, the darker colors like charcoal gray, dark brown, deep blue, etc. you do not have to print much White Ink to cover (mask) the T-shirt colors. But if the T-shirt is vivid red, strong purple or bright green, we will have to print more White Ink to cover the body color. Select 4 or 5. The default is "3", for lighter colors like pale pink, light yellow, sand, select 1 or 2. When you print with "Ink: White Only" or print on colorless garment like black, gray, select 3. "3" makes the smoothest white-gray-black gradation.
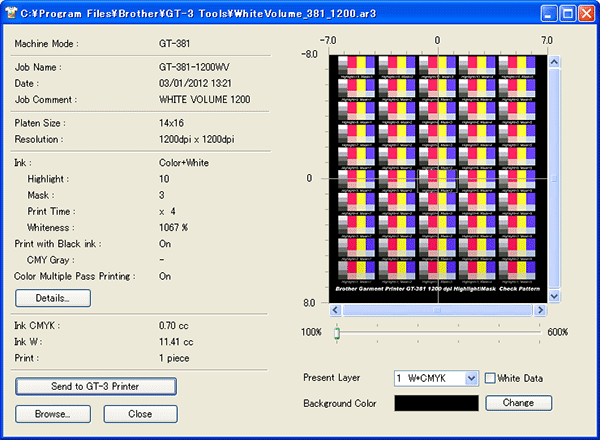
You can check the white print data with GT-3 File Viewer to see the difference. Also print "WhiteVolume_381_1200.ar3", "WhiteVolume_381_600.ar3", or "WhiteVolume_361_1200.ar3", "WhiteVolume_361_600.ar3" in [ Test Data ] of [ Brother GT-3 Tools ] in your PC. You can find out what number you should select.
|
|
|
Ink: Color Only |
| |
GT-3 prints with CMYK color inks like you print on white paper. No Pretreatment! You can arrange the Saturation and the Contrast of your image without editing.
|
|
Ink Volume |
| |
For anti-bleeding, lessens the amount of CMYK ink printed on thin, satin and twill materials, or even something a little water-repellent ones.
Print InkVolume 1200/600 in [ Test Data ] of [ Brother GT-3 Tools ] in your PC. The following photos are by GT-541, but the meaning the same. |
| |
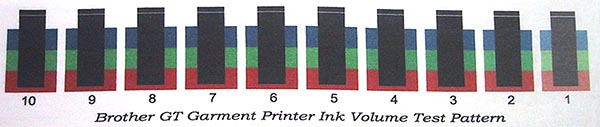
An example on cotton/polyester 50/50 T-shirt. It is OK with "10".
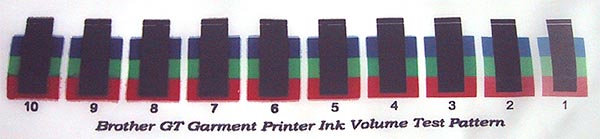
An example on polyester 100 T-shirt. Select either 2 or 3.
|
|
Print with Black ink |
| |
When you print on a black T-shirt, the T-shirt black is much darker than the ink black. Without black ink but with the base T-shirt color, the print image will look highly-contrasted and sharpen.
Also you can save ink. In this case, RGB=0 black is a Transparent Color.
|
|
CMY Gray |
| |
When you do not select [ Print with Black ink ], then you can select if you print CMY ink to make colors grayish or not. For example, the dark colors like below needs "blackness" + "less color saturation". If you want to save ink cost but get the similar print result on a black T-shirt and on other colors, then please put the check mark here. Without CMY composite gray, you can save ink but the dark colors are a little too vivid. If you print only on a black T-shirt, you can make it off. It works well when you want to print the original design more vivid on a black T-shirt.
|
|
Color Multiple Pass Printing |
| |
This menu, you will not have to select this unless you have a trouble... in some colors like pale orange, pale blue, pale green you see some uneven white lines (banding) there. This function moves the Platen in half way, so the print speed is doubled automatically but the pattern of scattering dots can be changed to make the white lines vague.
Also if you increase the White Ink Volume by Highlight, then this function is automatically turned ON to print more ink. The volume of CMYK ink is the same. Only the amount of Platen motion changes to half.
|
|
Default button |
| |
When you click this button, all the changed settings will go back to the default value of the selected Machine Mode.
|
|
Rollover Help |
| |
With mouse's rollover, there shows help of each setting. Check it if necessary. But if you need further information, come back to GT-3 Cookbook!
|