Use the garment printer more, and you will have less troubles. Keep the printer in good condition. Be sure to follow the process in the Manual, you can see each step clearly.
|
As you may know, the inside of the inkjet printer is not very clean. Wet ink mist may collect dust and threads around maintenance units and may damage the print quality. So routinely check the inside sometimes before turning ON and keep your GT-3 in good condition.
|
 Opening the Front Cover. Opening the Front Cover.
|
|
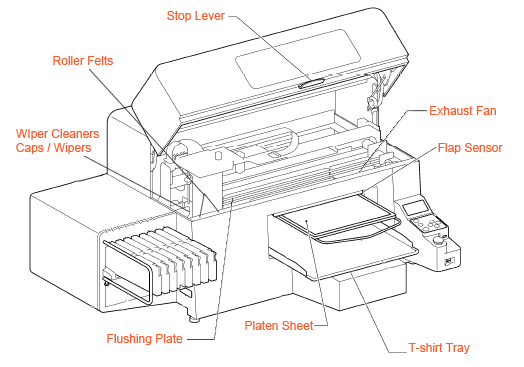
The check points are as usual; wiper cleaners, print head caps, wipers, flush plates (Felt and Sponge newly added), the front/back surface of obstruction sensor (flap sensor), Platen sheets, T-shirt tray, Exhaust Fan Filter and Roller Felts.
|
 Wiper Cleaner Wiper Cleaner
The most important point is to keep the wiper cleaner clean enough to absorb ink, which holds waste ink, it keeps the surface of the wiper blade clean, so that print heads can fire properly.
In other words, maybe head cleaning may not solve the misfiring and banding. Remember, wiper cleaner cleans the wiper blade, and the wiper blade cleans the print heads. If wiper blade is muddy with waste ink because wiper cleaner is muddy, then how can print heads keep clean? So check the wiper cleaners every time the maintenance parts exchange warning is indicated on the control panel. Use plastic gloves in cap cleaning kit if it is too dirty.
Refer to "Maintenance" page in basic operation manual or instruction manual for "step by step" instructions.
You have to move the Carriage from the Maintenance Position. When you REALLY EXCHANGE the Wiper Cleaner and other Maintenance Parts, select [ Maintenance ] >
[ Maintenance Parts Exchange ].
But if you feel you want to check the conditions, then
select [ Maintenance ] > [ Nozzle Cleaning ], otherwise the checking counter for "Maintenance Clock" returns to zero, this means your printer may suffer misfiring issue because the caution message of "Wiper Cleaner Life" will never show on the Display. So pay attention in selecting the menu.
|
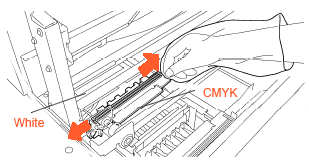
Pull out both edges to the outer side. Put it in the plastic bag.
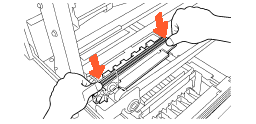
Mount the new Wiper Cleaner by inserting the claws at both ends.
|
Confirm the White side too, and keep both clean.
|
 Confirm the warning "Exchange Maintenance Parts" and keep those Maintenance Parts new and clean. The machine counts the head cleaning to indicate the timing. Personal hint: memo the date when you exchange them, then you will find how much time you can use and when to be replaced. Confirm the warning "Exchange Maintenance Parts" and keep those Maintenance Parts new and clean. The machine counts the head cleaning to indicate the timing. Personal hint: memo the date when you exchange them, then you will find how much time you can use and when to be replaced.
|
 Pay attention not to hit the dirty Wiper Cleaner around the Carriage Belt, Flushing Plate and Platen, etc. It will be very dirty and wet. Pull it out slowly and carefully not to spill ink everywhere around the printer. Pay attention not to hit the dirty Wiper Cleaner around the Carriage Belt, Flushing Plate and Platen, etc. It will be very dirty and wet. Pull it out slowly and carefully not to spill ink everywhere around the printer.
|
 Caps / Wipers Caps / Wipers
When you exchange Wiper Cleaner, check the Caps and Wipers (blade) of both CMYK and White sides as well, with the cap cleaning kit if they are dirty with ink or dust. Read the manual before cleaning.
|

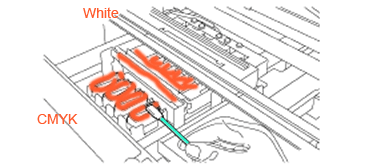
Apply the Wash Liquid to Clean Stick and remove the dirty waste ink and dust.
|
Take a look at the surface of Print Head Nozzles if they are clean. Click here for Nozzle Cleaning special page !
|
 Flushing Plate with Sponge and Felt Flushing Plate with Sponge and Felt
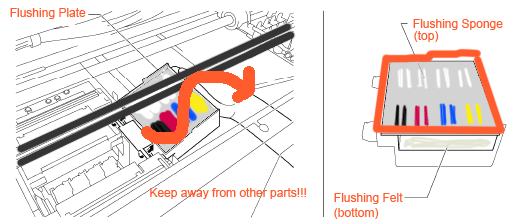
Keep watching the surface of the Flushing Sponge, sometimes in a very dry condition, the ink may pile up. Normally you can replace all the Maintenance Parts at the same time, but if you feel some nozzles are easy to miss, then check the top edge of the Flushing plate, if it is covered with dust and threads, and the Flushing Sponge on the top. Wipe off the dirt with a soft wet cloth with water, or you can use the Clean Stick and Wash Liquid, at the same time you clean the Caps/Wipers, after wiped off the waste ink.
|
|
 Front / Back of Obstruction Sensors Front / Back of Obstruction Sensors
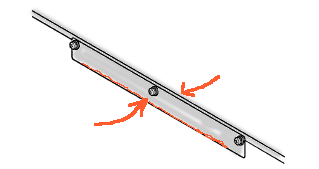
Check the front/back surface of the obstruction sensor not to damage the printing material when loading. If they are dirty with ink and/or dust, wipe off the dirt with a soft wet cloth with water.
|
|
 Platen sheet Platen sheet
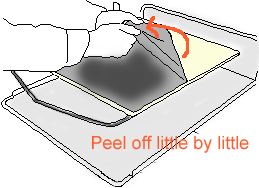
This cotton sheet is for holding a printed material flat. In addition, it catches the small mists of ink coming through the material as well. When the edges are loose and the surface wears out, peel it off and install a new one. If you feel it's hard to peel off, warm the surface with hair dryer to loose the adhesive tape.
|
|
 T-shirt tray T-shirt tray
There must be dust mounted at the back corners. Wipe off the whole surface sometimes.
|
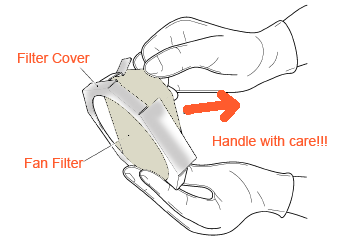
 Exhaust Fan Filter Exhaust Fan Filter
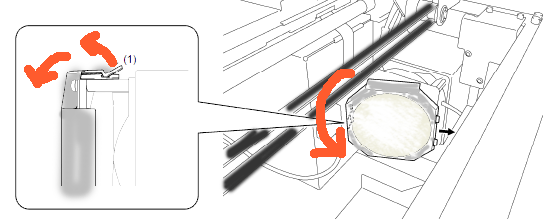
Because the ink drop gets smaller for 1200x1200dpi, the ink mist is surely produced. So GT-3 has a big fan to absorb ink mist. Remove the metal cover and exchange the Filter, the rough surface at the Platen side.
|
|
 Roller Felts Roller Felts
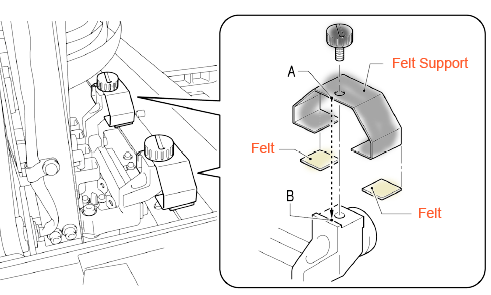
We need something to move the Carriage smoothly, so we put small Felts (CMYK side and White side) to wipe off the ink mist in printing. They are small but important to keep your printer clean. Be sure to replace when you replace the Maintenance Parts.
|
|
 If these Felts are not mounted properly, then they may not work properly. Be sure to fix flat and smooth when you reinstall. If these Felts are not mounted properly, then they may not work properly. Be sure to fix flat and smooth when you reinstall.
|
 After closing the Front Cover: After closing the Front Cover:
|
At the end, check the inside of waste ink tank and Waste Ink Tube, especially the 361/381, or your floor might suffer from waste ink flood...
|